Mapping the Crucible: A Detailed Evaluation of the Bunker Hill Battlefield
Associated Articles: Mapping the Crucible: A Detailed Evaluation of the Bunker Hill Battlefield
Introduction
With enthusiasm, let’s navigate by means of the intriguing subject associated to Mapping the Crucible: A Detailed Evaluation of the Bunker Hill Battlefield. Let’s weave attention-grabbing info and supply contemporary views to the readers.
Desk of Content material
Mapping the Crucible: A Detailed Evaluation of the Bunker Hill Battlefield
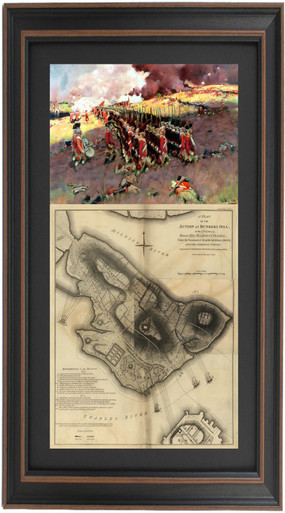
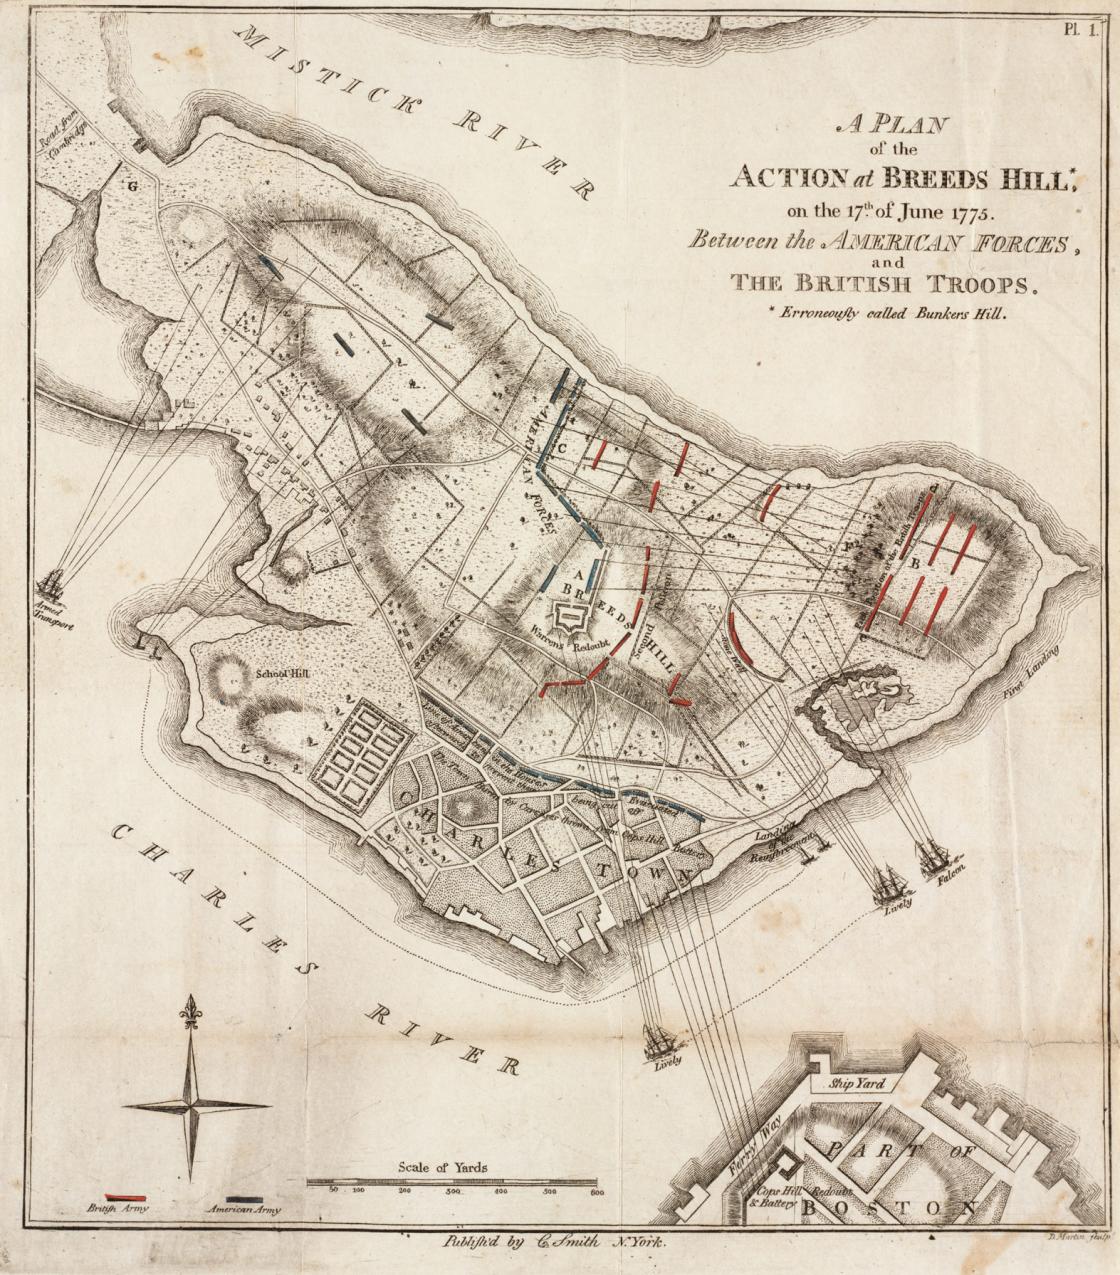
The Battle of Bunker Hill, fought on June 17, 1775, holds a pivotal place in American historical past. Whereas technically fought on Breed’s Hill, the enduring title displays the strategic significance of Bunker Hill itself within the broader context of the siege of Boston. Understanding the battlefield’s topography and the deployment of troops is essential to comprehending the tactical selections, the brutal preventing, and the finally Pyrrhic victory for the British. This text delves into an in depth evaluation of the Bunker Hill battlefield map, inspecting its key options and their affect on the battle’s unfolding.
The Geographic Context: A Peninsula Beneath Siege
The battle happened on the Charlestown Peninsula, a slim strip of land jutting into Boston Harbor. This peninsula, strategically positioned throughout the harbor from Boston, supplied the Continental Military a vantage level to harass the British forces occupying town. The terrain was removed from uniform. It featured a combination of comparatively flat floor, mild slopes, and the essential elevated positions of Breed’s Hill and Bunker Hill themselves. These hills offered glorious defensive positions, commanding clear traces of fireplace throughout the comparatively open house between them and the British traces on the Boston facet of the harbor.
Breed’s Hill: The Focal Level of the Battle
Whereas Bunker Hill lent its title to the battle, the preventing primarily centered on Breed’s Hill, a barely decrease however extra strategically advantageous place. Its proximity to the British traces and its commanding view of Boston made it a primary goal for the colonial forces. The map reveals a comparatively slim neck of land connecting Breed’s Hill to the remainder of the peninsula, a vital chokepoint that the Individuals tried to defend. This bottleneck, coupled with the hill’s pure defenses, allowed a comparatively small variety of American troops to successfully resist repeated British assaults.
Bunker Hill: A Supporting Position
Bunker Hill, located barely to the northwest of Breed’s Hill, performed a supporting function within the total protection. Whereas much less straight concerned in the principle preventing, it offered a secondary defensive place and a possible fallback level for the Individuals. The map reveals a much less pronounced slope on Bunker Hill in comparison with Breed’s Hill, suggesting a barely much less advantageous defensive place, however nonetheless providing vital elevation over the encompassing terrain. Its presence additionally helped to channel British advances, probably funneling them in direction of the extra closely defended Breed’s Hill.
The Rail Fence and Redoubt: Fortifications Shaping the Battle
The American fortifications on Breed’s Hill are central to understanding the battle’s dynamics. The map clearly reveals the swiftly constructed redoubt, a roughly triangular earthwork providing safety from musket fireplace. This redoubt, together with a rail fence extending from its northern flank, shaped the first line of defense. The rail fence, constructed from felled bushes and sharpened stakes, offered a big impediment to the advancing British troops, slowing their progress and inflicting heavy casualties. The mixture of the redoubt and the rail fence created a layered defensive system, forcing the British to advance by means of a number of killing zones.
The British Strategy: Routes of Assault and Casualties
The map reveals a number of distinct approaches taken by the British forces throughout their three main assaults on Breed’s Hill. The open floor between the British positions in Boston and the American redoubt supplied few pure obstacles, resulting in heavy casualties because the redcoats superior in formation below heavy fireplace. The map permits for a visualization of the sheer scale of the British advance, emphasizing the bravery – and the horrible price – of their repeated makes an attempt to dislodge the Individuals. The routes of assault, as depicted on the map, spotlight the challenges confronted by the British in coordinating their assaults throughout the comparatively open terrain.
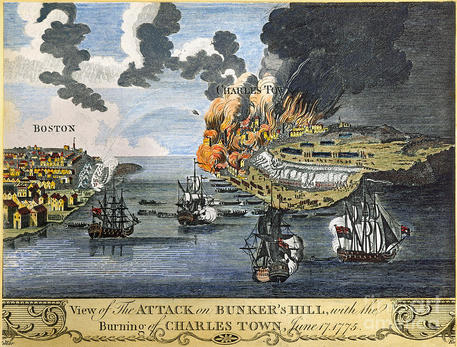
Charlestown and the Burning of the City:
The map also needs to embody the city of Charlestown itself, located to the rear of the American positions. The British choice to burn Charlestown, a controversial act in the course of the battle, is essential to understanding the broader strategic context. The hearth created a smoke display that obscured the American positions, hindering their capacity to successfully goal the advancing British troops. Concurrently, it destroyed priceless cowl and probably disrupted American provide traces. The map’s inclusion of Charlestown permits for a whole image of the battle’s affect on the encompassing setting.
The Naval Part: The Harbor’s Affect
The Battle of Bunker Hill wasn’t solely a land battle. The map wants to include the presence of British naval vessels in Boston Harbor. These ships offered artillery assist to the British land forces, shelling the American positions and contributing to the general stress on the Continental Military. The map’s depiction of the harbor and the positioning of British ships highlights the multi-faceted nature of the battle and the strategic benefits loved by the British because of their naval dominance.
Analyzing Casualty Figures in Relation to the Map:
The excessive casualty price suffered by the British in the course of the battle is straight associated to the terrain and the American fortifications. The map helps visualize why the frontal assaults throughout open floor resulted in such devastating losses. By overlaying casualty knowledge onto the map, one can pinpoint areas of intense preventing and perceive how the terrain and fortifications contributed to the carnage. This evaluation can present a deeper understanding of the tactical selections made by either side and the results of these selections.
The Strategic Implications: A Pyrrhic Victory
The British finally gained the Battle of Bunker Hill, capturing Breed’s Hill. Nonetheless, their victory got here at a heavy price, with vital casualties amongst their ranks. The map helps for example the strategic implications of this Pyrrhic victory. The excessive British losses demonstrated the energy of the Continental Military and their capacity to inflict critical harm on a well-trained and geared up skilled military. This victory, regardless of its price to the British, bolstered American morale and demonstrated to the world that the colonists had been able to mounting a critical problem to British authority.
Fashionable Interpretations and Historic Debates:
Fashionable interpretations of the Bunker Hill battlefield map typically give attention to the tactical selections made by either side, the effectiveness of the American fortifications, and the function of likelihood in shaping the battle’s consequence. Debates proceed concerning the significance of the battle itself, with some historians arguing that its strategic affect was overstated, whereas others emphasize its significance in boosting colonial morale and galvanizing assist for the American trigger. The map serves as a vital instrument for these ongoing discussions, offering a visible framework for analyzing the occasions and their affect.
Conclusion: A Lasting Legacy on the Panorama of Historical past
The Battle of Bunker Hill stays a strong image of the American Revolution. The battlefield map, meticulously studied and interpreted, gives invaluable perception into the tactical selections, the brutal preventing, and the finally excessive human price of the battle. By understanding the terrain, the fortifications, and the actions of each armies as depicted on the map, we are able to achieve a deeper appreciation for the occasions of June 17, 1775, and their lasting affect on the course of American historical past. The map is not only a static illustration of a historic occasion; it’s a dynamic instrument that enables us to have interaction with the previous, to query its narratives, and to raised perceive the complexities of the American Revolution.


Closure
Thus, we hope this text has offered priceless insights into Mapping the Crucible: A Detailed Evaluation of the Bunker Hill Battlefield. We admire your consideration to our article. See you in our subsequent article!